Creating Hatches
Use the Hatch command to fill enclosed areas or specified entities with a hatch pattern. Hatching a drawing adds meaning and helps to differentiate the materials and areas. Some drawing applications such as construction drawings require hatch patterns which can increase the clarity and legibility of a drawing. Along with patterns, you can apply solid hatches to fill in a bounded area with the current color by selecting Solid from the Pattern list. See Customizing Hatch Patterns to modify existing hatch patterns.
To set a hatch pattern:
- Select Draw > Hatch/Fill (or type Hatch).
- In the Hatch/Fill dialog box, from the Type list, select a pattern type.
Predefined: Lets you select from predefined patterns including ISO and ANSI conforming patterns, as well as patterns commonly used in specific industries.
User-defined: Lets you select a pattern you or your enterprise created.
Custom: Lets you specify a pattern determined by your Angle and Spacing specifications.
- If you selected a Predefined type from the Pattern list, select a pattern.
The Preview pane beside the Pattern list displays the selected pattern.
You can instead use the Select Pattern Style dialog box to select a type and a pattern by clicking .
.
To set the angle and scale the hatch pattern:
- In the Angle list, specify an angle for the hatch pattern.
Standard hatch patterns are made up of horizontal or vertical lines or drawn at an angle. A hatch angle of 0 degrees defines a horizontal line. The Angle list contains angle values between 0 and 360 in 15 degree increments. A positive angle rotates the pattern counter-clockwise.
- Use the Scale list to specify a value by which to scale the hatch pattern.
The Scale list contains values between .25 and 2 in .25 unit increments (default is 1). For example, 2 doubles the distances in the pattern and .25 reduces the original dimensions by 1/4.
Note: User-defined patterns cannot be scaled. To change distances in user-defined patterns, use the Spacing list.
- If you selected a User-defined type, in Spacing specify the distance between lines in the hatch pattern.
Specify the distance in drawing units (default is 1). Change the line spacing to customize the pattern proportions for specific graphics areas.
- If you selected an ISO Pattern type, use the ISO pen width list to select a pen width.
- Click Scale based on sheet's units to adapt the units to the sheet.
To set the hatch pattern start point:
- Specify a pattern start point.
Current drawing origin: Keeps the current hatch origin (default).
User-defined location: Click Specify coordinates to specify a point in the graphics area or select a location from the Use boundary list. To save the specified location, click Set as default.
To set boundaries for hatch patterns:
- Select a method to specify boundaries.
Specify entities : Lets you select the entities that form the boundary.
Specify points : Lets you click points in enclosed areas to define the boundaries.
Rebuild boundary : Replaces a boundary after removing (enabled only when using the EditHatch command).
Delete boundary entities : Removes boundaries from the set of entities that form the boundaries.
Highlight boundary entities : Displays the boundaries in the drawing.
To further customize hatch pattern options:
- Select Keep hatch and boundary related to update hatch patterns automatically if the boundary of the hatch changes (default).
- Select Create hatch for each boundary to generate distinct hatches with the same properties if you are adding boundaries of several areas at once. Do not enable this option if one connected hatch is required.
- Use properties of a selected hatch by clicking
 and specifying a hatch in the drawing.
 - Select a Placement for hatches in relation to their boundaries. Select Bring to Front, Send to Back, Bring in Front of Boundary, Send Behind Boundary (default), or Do Not Assign.
Click Additional Options to apply any of the following:
- Click Find internal regions to detect internal closed boundaries.
- Click a hatch Display style.
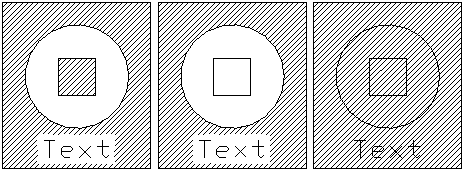
Out : Creates hatch patterns only in the outermost areas.
In/Out : Creates hatch pattern between alternate areas, starting with the outermost area (default).
Ignore : Ignores the internal structure and hatches the entire area. Hatch lines pass through text, block attributes, and 2D solids.
The following diagram illustrates the In/Out, Out, and Ignore styles.
- Select a default Origin setting.
Use current: Uses the origin point for the hatching specified with the current Hatch command.
Use source: Uses the origin of existing hatches. - Specify a Maximum gap size.
- Select from the Boundary group list.
- Click Keep boundaries to maintain the initial closed contour normally deleted when a hatch is created. From the Type list, select whether the boundary contour is created as PolyLline or Region.
Access
Command: Hatch
Menu: Draw > Hatch